
15/03/2011
Main Character - WIP Update - Accessories
Main character updated with belts and throwing knife holders.

Spline IK Animation Test
After playing around with the Spline IK method, I also found the progress along the path could be edited and animated to determine where the snake will be at set points in the sequence, which would prove very useful. Another benefit I have found with this method is that the actual vertices of the spline can be edited and animated, and no stretching will occur in the model's mesh, the path will simply be changed.


I created a simple test animation to see how effective this method of animation will be.
This has proven this method is probably the most effective for the results I intend to achieve. The only downside to this method is I am unsure how to rig the snake so I have control of the head. This is something I will look into.
Rigging with Bones
After testing the CAT rig I decided this was not the most practical method of rigging my snake.
I researched other methods and found I could rig the snake with basic bones and use a custom spline to drive the animation, almost like a train track. This sounded very appealing so I quickly created an IK bone chain to fit the snake, quickly skinned the snake to the bones and created a spline on which the bones would travel.


I will likely use this method for my final sequence, as it seems it will allow a larger level of customisation and control than keyframing, and any changes to the path will be visible instantly
I researched other methods and found I could rig the snake with basic bones and use a custom spline to drive the animation, almost like a train track. This sounded very appealing so I quickly created an IK bone chain to fit the snake, quickly skinned the snake to the bones and created a spline on which the bones would travel.


As you can see, by default the bones only affected the part of the mesh they were placed, suggesting the envelopes were too small and the bone count was not high enough. I experimented with editing envelopes and found that making the bones cover a greater portion of the model, the bends and coils became a lot smoother.


I will likely use this method for my final sequence, as it seems it will allow a larger level of customisation and control than keyframing, and any changes to the path will be visible instantly
13/03/2011
Final Year Group Project Blog
I am currently working as part of a group to create a short animation. Within the group my responsibilities include character design, modelling, texturing, rigging and animation.
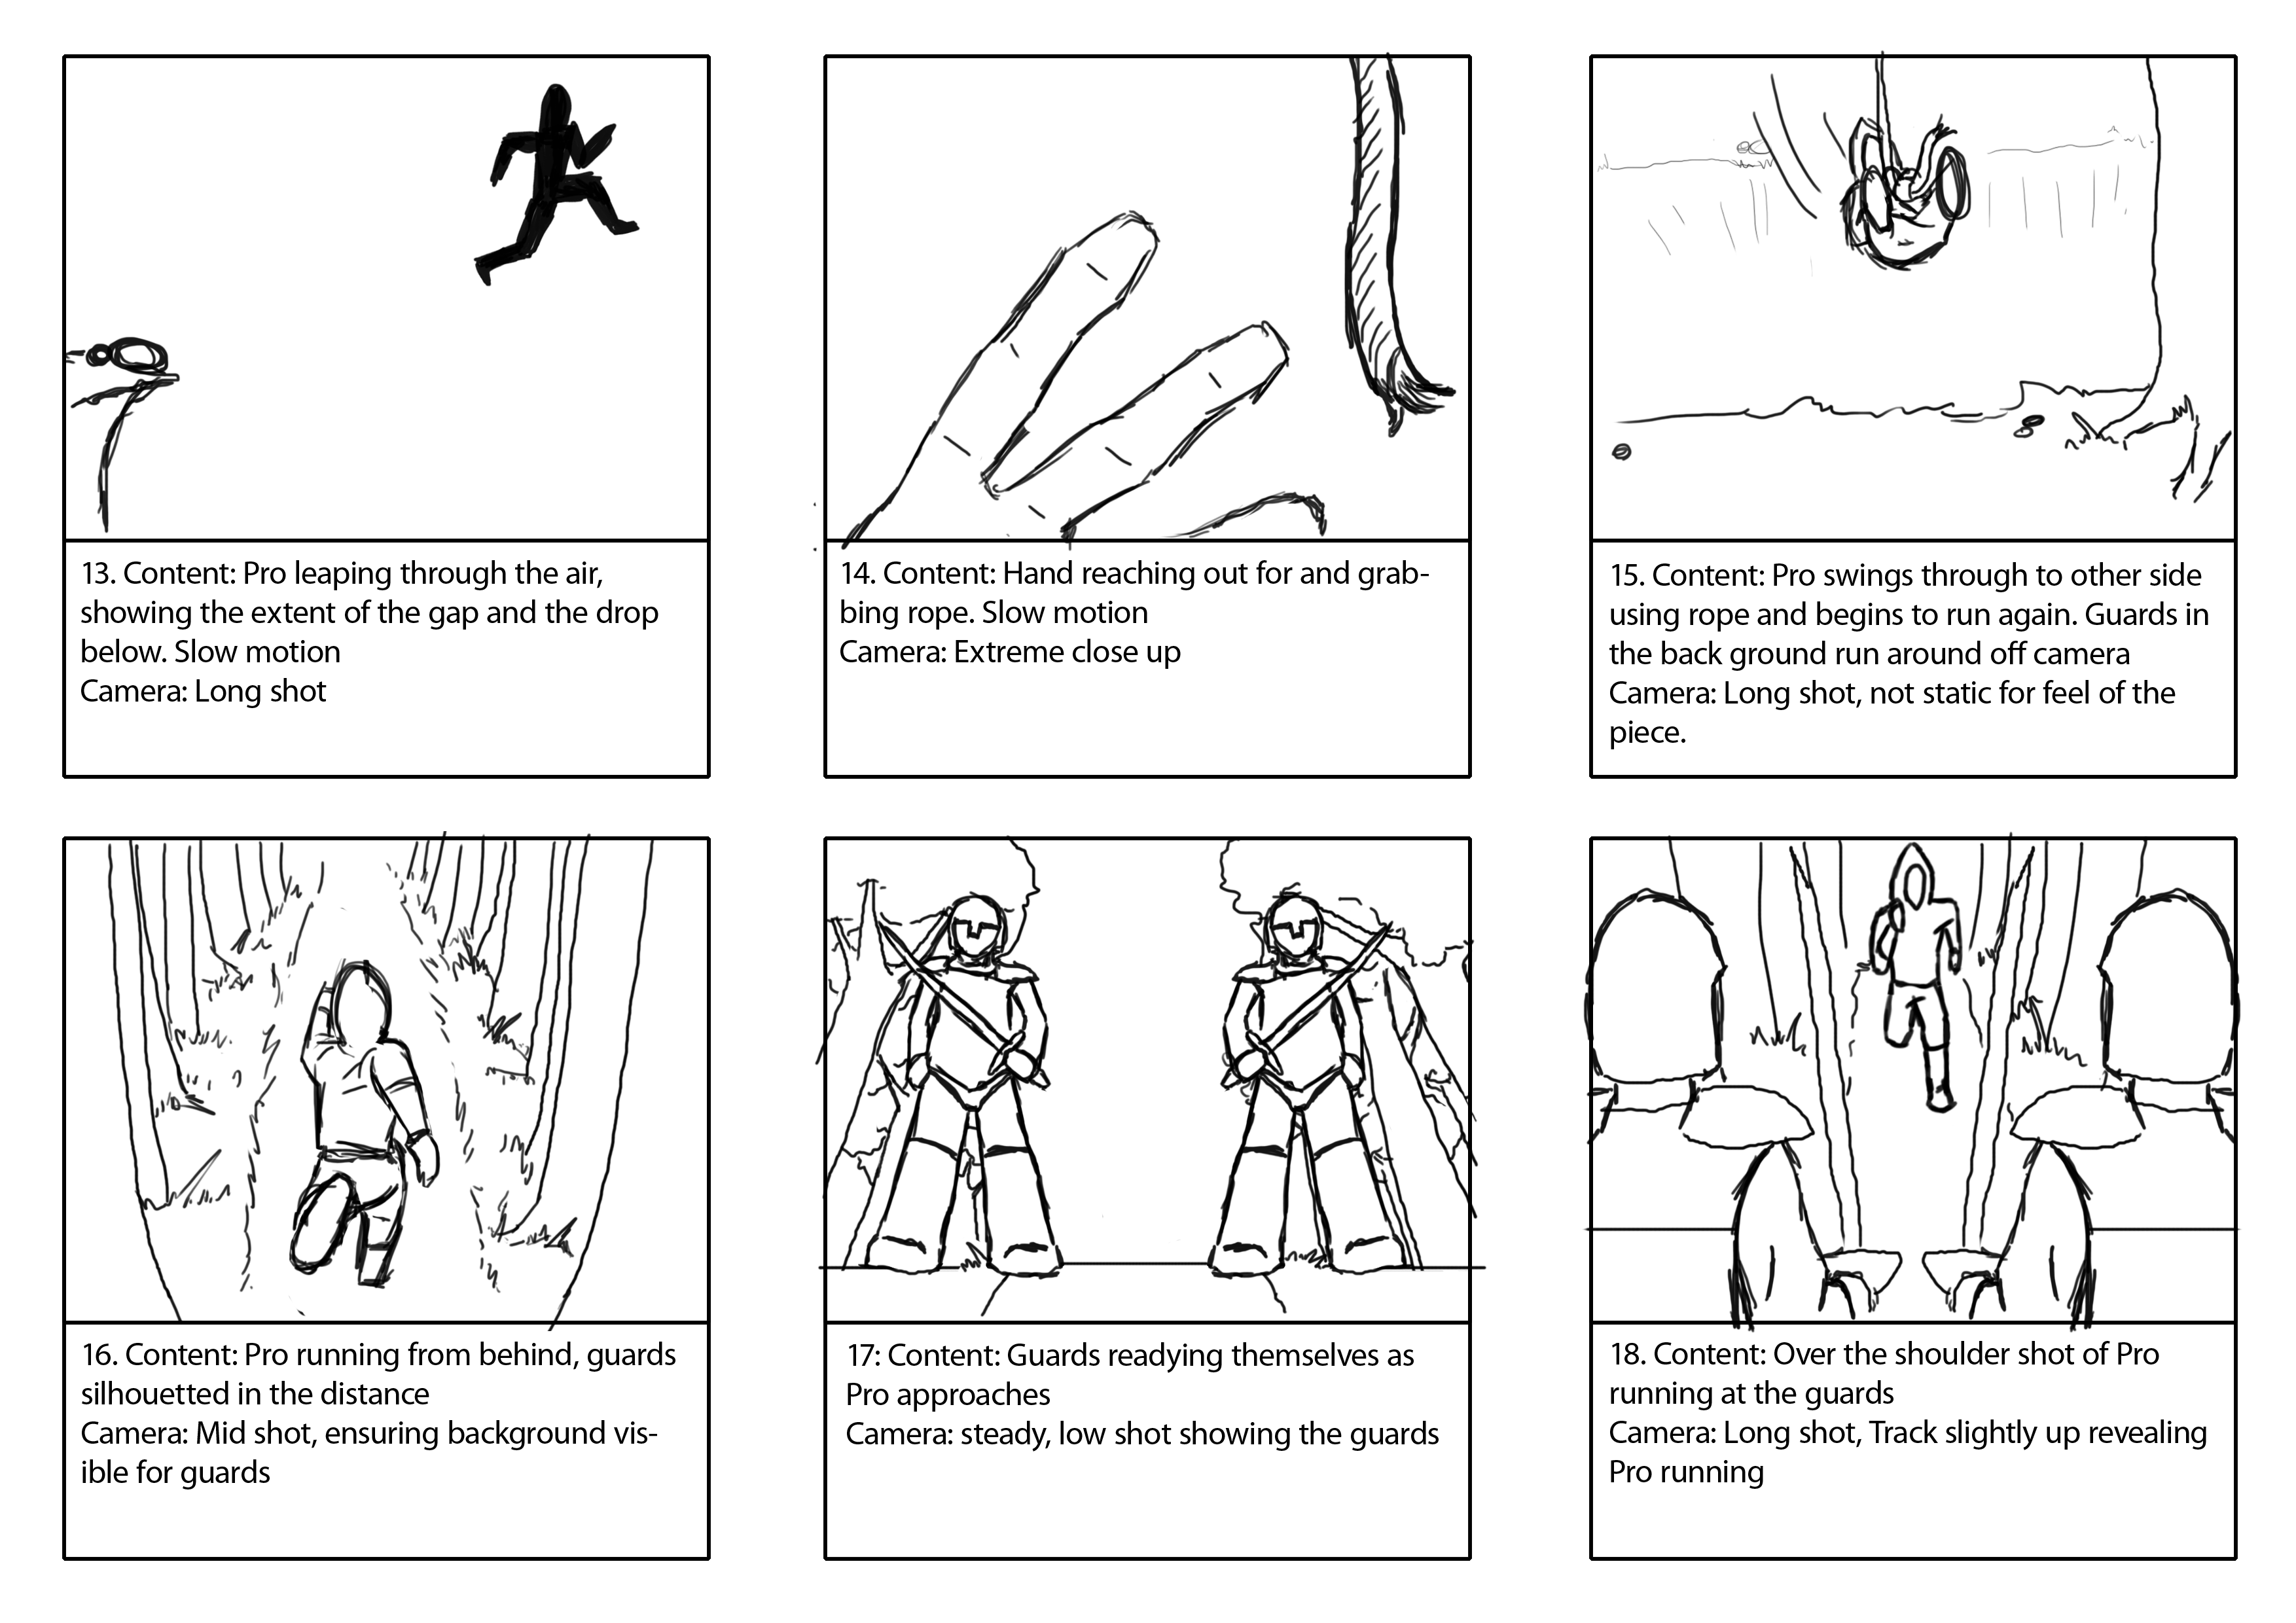
You can follow our progress on our blog.
You can follow our progress on our blog.
Snake Rigging Test
Before moving any further with my model I have decided to conduct a series of tests to determine the best way to rig and animate the low resolution model.
My preferred method of rigging would be through the use of the CAT system within 3DS Max. I created a custom rig preset and quickly skinned the model to gain some idea of how easy and effective the process would be. I then experimented with posing the snake to test the rig and skin.


The results of this test showed the bends looked square and too sharp. I was able to reduce this effect and improve most of the deformation by editing the skinning envelopes. Overall it looks a lot better but there are still some problem areas I was unable to fix.

While this may look a lot better, this is only a static pose and I have yet to test the way the rig animates. It's likely more bones will be needed to effectively recreate the fluid movement of a real snake. I also need to change the placement of the rig's 'neck' as it currently controls the front third of the snake and doesn't allow realistic movement or deformation of the head and affected body area.
My preferred method of rigging would be through the use of the CAT system within 3DS Max. I created a custom rig preset and quickly skinned the model to gain some idea of how easy and effective the process would be. I then experimented with posing the snake to test the rig and skin.


The results of this test showed the bends looked square and too sharp. I was able to reduce this effect and improve most of the deformation by editing the skinning envelopes. Overall it looks a lot better but there are still some problem areas I was unable to fix.

While this may look a lot better, this is only a static pose and I have yet to test the way the rig animates. It's likely more bones will be needed to effectively recreate the fluid movement of a real snake. I also need to change the placement of the rig's 'neck' as it currently controls the front third of the snake and doesn't allow realistic movement or deformation of the head and affected body area.
High Resolution Snake Work In Progress
Just an update to show high detail snake in its current state. Following feedback from my idea pitch I have decided to scrap the horror theme and instead I will focus on trying to create a nice, realistic animation of a new snake species. I intend to give the snake a camouflage ability so a lot of tests will be carried out to determine how possible this would be and how effectively it can be done.
I have refined the shape of the head to be more defined and look more like that of a horned viper. As the horror elements have been removed from my idea, the mouth will no longer need to be wide open and visible to the camera. I have made adjustments to the model so the mouth is closed, which has helped as before I had no way of seeing how well the bottom of the mouth lined up with the top.

There is still a little high frequency detail to be added and refined onto the head, and I intend to place a repeating scale pattern along the entire length of the body.
I have refined the shape of the head to be more defined and look more like that of a horned viper. As the horror elements have been removed from my idea, the mouth will no longer need to be wide open and visible to the camera. I have made adjustments to the model so the mouth is closed, which has helped as before I had no way of seeing how well the bottom of the mouth lined up with the top.

There is still a little high frequency detail to be added and refined onto the head, and I intend to place a repeating scale pattern along the entire length of the body.
07/03/2011
Main Character – Hi Poly WIP Update – Clothing
Since the last update I have added leather arm braces to complete the underlying symmetrical design of the character. With the basic symmetrical forms laid down, I have begun adding folds and creases to the clothing elements to breathe more and realism into the model. The top has also been adjusted to create the asymmetrical hemline present in the concept artwork.

Next I will focus on adding the 'accessories', such as the belt and the weapon holders.
At this stage the head is yet to be created and the hands are still incomplete.
Next I will focus on adding the 'accessories', such as the belt and the weapon holders.
At this stage the head is yet to be created and the hands are still incomplete.
03/03/2011
Main Character – Basic Clothing Elements
The first set of work in progress renders of the high detail sculpt of the lead character's body.
Basic clothing elements have been created using extractions from the base model to mark the key features of the character's design. So far the basic symmetrical forms have been plotted, with further detailing and asymmetrical features to be added.

The first set of work in progress renders of the high detail sculpt of the lead character's body. Basic symmetrical forms and features have been plotted with finer details and asymmetry still to be xadded.
Basic clothing elements have been created using extractions from the base model to mark the key features of the character's design. So far the basic symmetrical forms have been plotted, with further detailing and asymmetrical features to be added.
The first set of work in progress renders of the high detail sculpt of the lead character's body. Basic symmetrical forms and features have been plotted with finer details and asymmetry still to be xadded.
01/03/2011
Main Character - Base Sculpt
After the rough base model was created in 3Ds Max it was taken into zbrush so the basic underlying forms could be sculpted and proportions altered, allowing clothing to be created on top with deforming the underlying structure of the model.
Some subtle muscle definition and bones were sculpted to mark out the basic features, to help with placing the clothing elements and later the edge loops in the topology.

Parts of this will be masked and extracted to create basic clothing elements as separate subtools, which will then allow them to be individually sculpted to add detail .
Some subtle muscle definition and bones were sculpted to mark out the basic features, to help with placing the clothing elements and later the edge loops in the topology.
Parts of this will be masked and extracted to create basic clothing elements as separate subtools, which will then allow them to be individually sculpted to add detail .
28/02/2011
Main Character – Base Mesh
Using the concept design as a reference, a rough base mesh was created in 3Ds Max to act as a starting point for the high polygon sculpting in Zbrush. At this stage the topology is not important but the mesh was kept quadded to allow effective sculpting within zbrush.

25/02/2011
Hejira - Final Character Concept
Here is the final concept art for the lead character, with added throwing knives and a small dagger.




22/02/2011
Concept Art - Main Character
Finding a look for the main character was rather difficult as we wanted him to have some form of protection while remaining somewhat agile due to the fast paced actions he will perform. Our story also requires that the character appears mysterious, so a hood or a covered face seemed the most effective way to do this.
The image below shows the evolution of the design for the main character, which we felt was initially too similar to characters seen in Assassin's Creed. This is something we wanted to try remove from our character while retaining the mystery and strength of character. The earliest idea for the story was that it would be Robin Hood related, so I experimented with adding more 'Robin Hood' style elements to the character.

I then began adding colour to get a feel for how the character would look in the animation. Woodland colours seemed very suitable as this is the environment the story is set in, but darker shades were used to set the character apart from the environment while helping to suggest he has bad motives.

The image below shows the evolution of the design for the main character, which we felt was initially too similar to characters seen in Assassin's Creed. This is something we wanted to try remove from our character while retaining the mystery and strength of character. The earliest idea for the story was that it would be Robin Hood related, so I experimented with adding more 'Robin Hood' style elements to the character.

I then began adding colour to get a feel for how the character would look in the animation. Woodland colours seemed very suitable as this is the environment the story is set in, but darker shades were used to set the character apart from the environment while helping to suggest he has bad motives.
07/02/2011
06/02/2011
Research and Development into Industry Requirements
Compositing
I found a skillset outline for a compositing job, which effectively indicates how I can achieve a successful visual effects sequence while proving my suitability for employment.
“Compositors work in most areas of animation and post production.
They are responsible for constructing the final image by combining layers of previously created material. Although it is primarily a 2D role within the 3D world of CGI and VFX (Visual Effects), Compositors need a thorough understanding of the CG process combined with relevant artistic skills.
In post production companies, some TDs (Technical Directors) may do their own compositing.
What is the job?
Compositors work at the end of the production process. They receive material from various sources which could include rendered computer animation, special effects, graphics, 2D animation, live action, static background plates, etc.
Their job is to creatively combine all the elements into the final image, ensuring that the established style of the project is respected and continuity is maintained.
To achieve this they enhance the lighting, match blacks and other colour levels, add grain where required, add motion blur (if appropriate), create convincing shadows and make sure levels combine together seamlessly, keying (see glossary), rotoscoping and creating mattes where necessary.
They work closely with Lighters and need to have technical knowledge of how 3D lighting works in order to understand the 'multi passes' that the lighters create. They also liaise closely with Render Wranglers to progress work through the department.
Compositors need the talent to make artistic judgements, the technical skills to take practical decisions and the ability to analyse and solve problems.
Key Skills include:
- extensive knowledge of current compositing software such as Shake and After Effects;
- knowledge of various other programmes including Photoshop;
- understanding of 3D animation process, particularly Lighting;
- a good eye for composition, colour, light and shadow;
- good knowledge of keying process;
- methodical and thorough approach to work, and attention to detail;
- ability to communicate with colleagues and work as part of a team;
- ability to take direction and willingness to address comments and make changes;
- ability to work with a minimum of supervision;
- ability to deliver on schedule, working under pressure if required;
- respect for the procedures and requirements of a particular studio, production or pipeline;
- Knowledge of the requirements of the relevant Health and Safety legislation and procedures”
http://www.skillset.org/animation/careers/article_4926_1.asp
Show-reel Criteria
While searching for suitable showreel criteria I found a handy list of showreel tips on Double Negative Visual Effects' recruitment page (http://www.dneg.com/jobs).
While these are only the opinions of one visual effects company, they will prove very useful to consider when creating my own showreel to send to companies.
- Firstly, and most importantly, please ensure that your showreel is on a playable DVD video, not in quicktimes, and that it is working correctly. Print out your CV/resume and post this in with your reel and a breakdown sheet that highlights exactly what parts of the shots on the reel are yours. Just in case these get separated, make sure that your DVD also has your name and contact information on it - please add this in permanent marker, as a sticker can cause the DVD to jump.
- We only want to see the work that you're truly proud of. Ideally, the reel shouldn't be much longer 2 minutes for graduates and 3 minutes for experienced professionals (although this is only a guideline) and your best work should be at the start of the DVD. If you are a recent graduate, make sure that you put a snappy montage of your best bits of work on there, please don't just send in your final year project.
- Where possible, add in breakdowns and passes for your shots - ie. If you are a Modeller, add the topology to your render and if you have a compositing showreel, show roto mattes and before and after breakdowns so that we can see how you work. It can also be helpful in 3D to show your UV layouts, and also displacement maps as well.
- Don't spend too much time editing your reel to music - we watch most reels on mute as we're only interested in the images!
Justification of choices made
My desired job would involve 3D modelling and animation, so I have made this the focus of my visual effects sequence while still meeting the requirement of integrating digital elements with real world film. My aim is to make the model look and act as realistically and believably as possible and place this convincingly in my real world footage, which will require good modelling and animation skills as well as a good understanding of lighting and compositing techniques. When placed in my showreel I believe this sequence will show my suitability for employment in 3D Modelling, Animation and Visual Effects.

Research into proposed techniques
3D Elements
In order to create the 3D snake creature, there are several steps I will have to take.
Matchmoving
After capturing my footage, I will need to use matchmoving software such as syntheyes to create a digital representation of the camera. It is important to make sure the captured footage has enough standout elements to allow a good track. This will ensure any 3D elements I create will sync with the elements in the shot footage, making the 3D elements realistically appear as if they are in the scene.
Modelling and Texturing
First, I will model the snake to as high a quality as possible, to ensure it looks realistic. I will also have to texture the snake. As the snake will be fairly close to the camera in some points, it is important that I create the textures to a high enough resolution and quality that the illusion is not lost.
Rigging
After the model is complete and the textures have been created, I will need to create a custom rig to allow the snake creature to be animated. This will be done using the CAT system within 3DS Max as it will allow me to create a custom rig to suit the model very easily.
Animation
I will animate the snake creature using the custom rig I create, keyframing each bone to create realistic snake-like animation. It may be useful to create simple 3D representations of some elements such as trees to help convincingly animate sections where the creature will interact with these elements.
Lighting
It will be important that the 3D elements are lit in the same way as the live footage. For this reason I will have to be mindful of the lighting when capturing the footage, and attempt to convincingly recreate this within my 3D scene before rendering. It may also be useful to create simple 3D representations of some objects within the captured footage and set them to receive shadows only, such as trees. This will allow me to render the creature along with the shadows it would cast on the surrounding objects, creating a much more convincing illusion.
Compositing
To ensure the most streamlined integration of the 3D elements, I will render them in passes as image sequences with the alpha channels in place. This will allow me to combine the separate passes within after effects and overlay them onto the captured footage easily. After this, several steps will need to be taken to make the CG elements realistically appear to be in the scene.
Colour Correction
It is very likely that the 3D elements will stand out when placed in the live footage, so colour correction will need to be added to make the colour range of the 3D elements match that of the footage.
Masking
It will be important to mask off any elements of the original footage that the 3D elements would sit behind, in order to ensure the 3D elements appear to be in the scene.
05/02/2011
Visual Effects Blog
I have created a separate blog to document the progress of a visual effects sequence I will be creating.
The blog can be found here.
The blog can be found here.
Creature Concept Sketches
After researching various types of snake and dinosaurs I created the following sketches to show how the snake creature in my sequence may look.
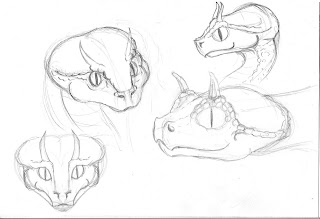
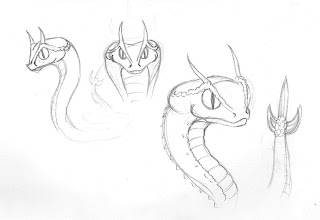
After creating some sketches I was happy with, I decided to attempt to create a 3D sketch in zbrush, concentrating mainly on the face. I am very happy with how this turned out and found it allowed a lot more freedom and experimentation than simple pencil and paper.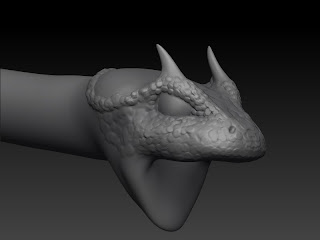


After creating some sketches I was happy with, I decided to attempt to create a 3D sketch in zbrush, concentrating mainly on the face. I am very happy with how this turned out and found it allowed a lot more freedom and experimentation than simple pencil and paper.

Idea Overview
I propose to create a visual effects sequence with 3d elements composited into real footage. I plan to model, texture, rig and animate a snake-like creature and convincingly integrate it into real life woodland footage. The sequence will be created with the idea that it will be a short scene in a thriller/horror movie based around the snake-like creature.
Visual Effects Blog
As part of my university course I will be creating a visual effects sequence.
I have created this blog as a means of documenting and annotating my tests, renders, prototypes and ideas as the piece progresses from concept to the finished sequence.
I have created this blog as a means of documenting and annotating my tests, renders, prototypes and ideas as the piece progresses from concept to the finished sequence.
25/01/2011


16/01/2011

15/01/2011


30/11/2010
Low Poly Boot - Research Project
The purpose of my research project is to learn how to successfully use different maps to create an effective texture, with the main focus being on making low poly objects look more detailed than they actually are.
I created a prototype model to demonstrate what I have learned from my research.


I created a prototype model to demonstrate what I have learned from my research.

Comparison of the high poly sculpt and the low poly boot with the normal map applied. High poly was around 2.6m tris, imported at 800k and optimized to 41k, normal maps were then baked from this. Low poly is 160 tris.

The low poly boot.

The boot rendered with only the normal map applied.

The boot with the diffuse and normal map applied. The diffuse map has an Ambient Occlusion baked in for extra depth.

The specular map added to create the fully textured boot.
I am impressed with the results, as the final low poly model looks like it has a much higher poly count than it actually does. I could improve the sillhouette of the model by adding extra polygons for the metal rings, but the purpose of this test was to use an extremely basic version of the high poly and still achieve a good result.
17/11/2010
Character Base Mesh and Zbrush Sculpt
Work in progress screenshots of the base mesh for my character. Click for larger views.


02/11/2010
Sketches for Motion Graphics Cutscene
A couple of images I've created to be used in my motion graphics cutscene.


More of these will be posted as they are completed.
24/10/2010


23/10/2010


Subscribe to:
Posts (Atom)